Showing posts with label process post. Show all posts

Using a panel to create a Thank You Quilt

>> Tuesday, September 10, 2019


I'm sure I'm not the only quilter who has a list in her head about the quilts she wants/needs to make for others. When we moved last year the ongoing joke was that my quilting room needed to be much bigger as it seemed to be the location for the majority of the boxes being unloaded and moved into the house. Hmmmm. In the end the talk amongst my husband's friends (the movers) was that it would seem like they each deserved a quilt!


studio e wildlife panel

Thinking about making a quilt for three different men made has kept my brain busy. When I walked into my local quilt shop last month and saw this panel I knew it was perfect for one of those quilts!
This panel is called, Woodland Wonders, by Studio E. It reminds me of the decorative rugs from the 70s that people would put on the wall - especially the green/blue tinged sky. I bought the panel and put it up on my design wall so I could look at the color palette and think some more.
Then I started pulling from my stash.

panel with coping strip

I found a Banyan batik blue that has flecks of green in it. The blue does a good job of framing the scene bringing out the blues in the panel and complementing the other colours. I also found a meter of grey fabric and decided it would work well as a background colour.

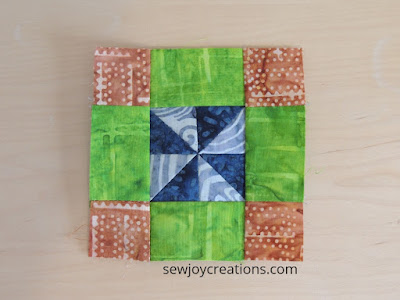
My next idea came about because most of my stash fabrics that I found to go with the colours in the panel were small - less than a fat quarter and most just strips and bits. That led me to think about making small blocks with a mix of colours. 

4 inch scrap block mini pinwheel quilt block
I love this little block! I like how it let me use up really small pieces of fabric and how I had to get creative and add more sections to the block to use the fabrics I had.

prepping fabric for small blocks

The photo above shows how I had to stop myself from making the blocks before I planned more of the quilt. It didn't make sense to cut small pieces before I had all of my larger pieces. I decided at this point that I would make the small framed pinwheels and set them on point around the panel using the grey fabric and then make larger pinwheel blocks to go around next.

I cut the bigger pieces from my stash into 3 1/2" squares and then I had more of a variety of scraps to create the mini pinwheels. 

panel quilt on point border

Here's some progress! You can see that I changed my mind about making all the blocks in the first border framed mini pinwheels. To be honest, I thought that was a lot of work and would actually take away from the panel. I played a bit more with that blue Banyan batik and set the blocks between blue and grey setting triangles and put just a plain square of fabric in between some of them.

Back to it!

Remember the Online Quilters Meet and Greet is still happening! Lots of quilters have visited here (waving hi!) and you can keep visiting and entering the giveaway all month.

 Online Quilters Meet and Greet 2019

Click on the image above to go visiting :)

You can enter the giveaway once from each of the blogs you visit - and it's a treat filled giveaway! Enjoy!


With Joy,

Sarah V.

 Click to subscribe to Sew Joy newsletter


Read more...

Father's Day Quilt Challenge

>> Thursday, June 12, 2014

My husband may or may not have been serious when he mentioned last night that I should make him a quilt for Father's day.

Any other day I might have pretended to not hear him or rolled my eyes at him, but I had already been thinking about making him a quilt!

hmmm

Here's the beginning pile of my idea this morning.


My original idea for a small wallhanging to replace the one acting as a curtain in his music playing space changed when I realized I had more than a fat quarter of this fabric. I had a whole half yard!


I have another pattern that I have been putting off working on. I decided to go for it and make another quilt with it to see if my measurements were right (it's been awhile!) I was amazed as I started to measure how I had just enough of every fabric I needed.


And I mean exactly! You can't really read the sticky note in this photo, but I had to 'make' pieces by sewing scraps together. This is all the pieces I needed and what was leftover from the shirt that I carefully cut apart when I was at teachers college to make this pillow.


Once I finished cutting all the pieces I needed it was time to clear off my design wall.


This is what it looks like to the left of my sewing machine - layers of things to sew!
You can see I have selvages lined up for what I thought was going to be my next project.
Beside the selvages are my pieces waiting to go up on the design wall.
On the top is my latest basket block. I think making these blocks has become my leader and ender project for the year! I love using up my stash to make them.


The first place marker pieces go up.


The next decision to make - should the stripes go the same way or intersect?


This was how the top looked when I added the half square triangle units. I really like it.

I mean really really like it.

I almost went with this. {I knew I had white in my stash and everything!}

What it showed me was how much traditional quilting patterns - structures of the blocks, placement of colours, basic shapes - influence my own designing. I guess I start at traditional and just keep adding!


Next post I'll show how the design grew on the wall.

{I'm actually now at the step of adding a border to make the quilt a little bit bigger!}

With Joy,

Sarah V


Read more...

Progress on Picking Block Fabric for Aurifil BOM

>> Tuesday, June 11, 2013


I started working on the June Aurifil BOM on the weekend. My fabrics were brought upstairs by my daughter so I could play in bed!

 Pat Sloan went through her process of picking fabrics this month on her blog. You can see her process here. I thought I'd share mine too.

I keep my  fabrics for the blocks in a pile and put the fabrics I used for the last block on the bottom. This way my fabrics are already in rotation so that, hopefully, all of them get a fair shot at being in the blocks equally. 

 In this photo you can see my fabric pile on the left and my small leftover cuttings from previous blocks on the right.


I looked at the block next and checked how many fabrics it uses, plus a background. 
Here's the next 5 fabrics in my pile. The blue is my background.

Then I looked at the block again and compared its design composition to the first five blocks.


Sorry for the glare on the photo I can't seem to edit it away (remember I am using my bed for my design wall!)

I sorted the blocks and discovered that there are already 3 blocks (the bottom row) with a lot of background showing and only 2 with very little background (the top row). 
This month's block falls into the category of having a lot of background. 

How did this affect my fabric choices?


Well, it did and it didn't!
 I wanted to make sure that fabrics that had dominant roles in those blocks in the top row didn't take over in this block.
 I wanted fabrics to look different in this block because they are each going to have to hold their own against the background and in relation to each other.
 The designer used a lot of 'fuzzy' cutting in this block, which I like.
 I'm trying to look at different parts of the patterns in these fabrics and showcase them in this block.


We'll see how I do! I had to stop after cutting a few pieces. The motion still hurt my abdomen which is healing, but still quite tender (sneezing and hiccups hurt!) It may be a bit before I go any further, but I wanted to share my process - and progress - before it slipped away from me.


With Joy,
Sarah Vee

Read more...

Quilting Designs with Freezer Paper

>> Tuesday, October 30, 2012


I am slowly quilting this wallhanging. I use freezer paper to mark my design, iron it to the quilt top, and quilt. This is the centre quilting design.


This is one quarter of the outside design. I drew most of the lines on here. Some places, like the arc over the middle flower and the two large leaves will have a double line of stitching. I learned the hard way by stitching both through the freezer paper in the centre, NOT to do both lines now. Once I tear off the paper I will add the second line of stiching. This section I went over with a marker so I could trace it 3 more times for the other corners.


Here is an awkward photo showing all 4 corner designs. This is the size of the entire wallhanging. It is laying on top of a card table here - to give you a sense of size.


The leaves will meet up from each side of the design - one resting beneath the other. The triangle shape between them will be quilted simliar to the ones in the centre.


I'm working out of the house more right now and finding it hard to quilt AND blog about it! The most I have been online recently is to unsubscribe to many of the newsletters etc. that I was getting. Now my email is more manageable freeing up valuable time to visit blogs.

My goal right now is to keep working on these 3 wallhangings {this is only a peek at one of them!} with the hopes of sharing them here before December. I am going to start 15 minutes of quilting a day to get these done. 


Prayers and thoughts to all who are enduring through Sandy and other weather related woes. 
Peace and Joy,
Sarah Vee

Read more...

Anna's Song - Process Post

>> Wednesday, August 15, 2012


I finally cut into this half yard print my sister gave me. I cut 6, 10 inch squares.


This summer my sewing space has been shrunk into the laundry room. I'm not really complaining as I think the trick to a studio vs. space is a DOOR that SHUTS! Here is another advantage - the top of my dryer works as a great prep station.


Believe it or not, I'm using the cutoff strips from my Liberated Churn Dash quilt for this project. This is the backing fabric and the strips were cut off when I joined the panels of the quilt.  I'm also only using the strips that are cut with short stripes on them - the bottom ones in this photo. The rest I have set aside for my Trust Joy panel still. Waste not, want not!


I had a couple of ideas that I wanted to try when I started cutting. First I really liked the challenge of layering a print on top of a print. A little wild, I know. Several times I resisted looking for a solid to add or to at least separate the blocks with some white. But, I wanted this to be quick - no second guessing.

I knew I wanted to do this free form cutting similar to the wonky crosses by Elizabeth Hartman. 


My first block I trimmed before making a second {oops!} and it wasn't quite big enough.  I ended up adding some strips to build it up to 10 inches square.


I also wanted to try making the outside border an extension of the inside blocks. I made only 4 blocks and then cut my remaining 2, 10 inch blocks into 2 inch strips.


A family friend and close neighbour just passed away after 6 long months of trying to recover from lung surgery. She was a shy, feisty German lady of 80. This final combination of frenzied prints remind me of her.  It measures approximately 25" x 26".


With Joy,
Sarah Vee

Read more...

Design of the Joy Quilt

>> Sunday, April 1, 2012


This is the second design process post for the Joy Quilt. The first post is here.


This is the theme fabric for the quilt.
I'm using it for color cues as well inspiration for the design.

This is what I've come up with for the design of the quilt. 


The middle will be a panel made up of two trees that echo the design of the ones on the theme fabric. I'm thinking about using a solid burgundy fabric to make a bias applique edge around the trees to highlight them like on the theme fabric. {I'm a little nervous about this idea!}
 The panel will be bordered on all sides by my Joy Framed block, some with an appliqued daisy and the remaining blocks with the theme fabric fussy cut in the centers.


My idea for the background of the panel  has already changed - twice!

Idea #1
First I was thinking to make the whole quilt have a background. I was going to use this Denyse Schmidt dot fabric as the panel background and behind the applique daisies.
I was really trying to think of a modern, stream-lined look for the quilt. Not too many fabrics, large scale geometrics and solids.
I thought about using the fat quarters we already have in the corners of the Joy Framed blocks and the Denyse Schmidt dots as the background.

Idea #2
Then I thought the dots might look too busy behind the trees - take away from them as the middle of the panel. I did a little bit of number scribbling and figured out I could use 7 fat quarters to make enough 6 inch squares to build the background of the panel. Then I would use the dot fabric in the background of the Joy Framed blocks - basically switch the design around. 


Then I asked my daughter what she wanted.

A traditional quilt.
What does she mean by traditional? Scrappy!
 Lots of different fabrics.
Blocks made up of lots of pieces.


The Current Idea!
Buy more fat quarters!  LOL!

The plan now is to make the background AND the corner squares out of fat quarters.
I'm planning to make the stars of the Joy Framed blocks all in solid colors - and that might change to just one or two colors.


My daughter also wants LOTS of the lime green. I think the quilt is starting to look like a pink quilt. Not a bad thing, but - it's definitely different from a lime green quilt. I'm trying to remedy this situation by using some lime green prints on the back. And the applique daisy block centers will probably be lime green too - Kona Solid Zucchini green to be exact!


Oh, and the large rectangle beneath the trees on the panel will be the Amy Butler lime green print. The little triangles are for Prairie Points to make the grass look 3D - another request from my daughter.

One other thing that I'm thinking about changing is having all of the applique daisy blocks at the bottom of the quilt - so the flowers look like they are in the grass instead of scattered around the quilt.

That might change again too!

There are two more things I want to add from a design perspective:
  • more blue
  • an applique butterfly on the panel similar to the ones in the theme fabric


Next time I'll show you some more of the fat quarters that I've been buying for this quilt.


With Joy,
Sarah Vee

Read more...

Joy Quilt Process Post #1

>> Sunday, March 25, 2012

This is the beginning in a series of post as I start working on a quilt for my daughter.

The fairy sprite fabric above, a mere fat quarter, is our inspiration piece.

Sprites of Tillbrook from Alexander Henry 2008. Pretty much gone from the quilt shops.

Behind it in this photo is some Denyse Schmidt dots which play rather nicely with the fabric.


But I'm getting ahead of myself!


These are the fabrics from my daughter's stash that go with the sprites. Some are from the same line. All are fat quarters.


Here's a few additions from my stash added in. I have about a yard of the large Amy Butler print on the left.  See how nice those corals play together?!


As seems to happen around here, my daughter requested I use one of my block designs.
Joy Framed which was in Quiltmaker's 100 Blocks, volume 3.

{remember it was my husband's idea to use the liberated churn dash block in my Sew Modern Bee quilt!}

In the next process post I'll show what the design is for the quilt right now. 
My daughter knows as well as I do that plans change! Already she has surprised me with how she wants the quilt to look.

Since the quilt is a request for Christmas, I plan to do an update monthly on the 25th. At the beginning you might see a few more as plans have changed a few times since we started looking at these fabrics last week!


With Joy,
Sarah Vee


Read more...

Cutting with Scraps in Mind

>> Saturday, February 18, 2012

I am finally getting back to/starting to work on this quilt. I used my quilting time each day this week, setting the oven timer for 30 minutes, cutting the black fabrics I set aside for this quilt.

The first day I ironed all my black fabrics.
 It made cutting fabrics the rest of the week a lot less fustrating!


This is the designated drawer for the quilt's fabrics. You can see some of my piles already cut. I cut a lot of the beige/tan fabrics last year.

Each pile of cuttings is marked with what size and shape it is {this is 8 3/8 inch squares} and underneath how many I have cut {12}.
The bottom right shows how many I need total under the slash {22 pieces}
As I cut more I scratch through the last total and write the new total. 

Most of my fabrics I cut before I thought to take photos and share with you how I got the most out of each piece! 
This is one of the larger pieces I worked with. I think it was around a half yard of fabric, which I kept folded for most of the cutting below.


If you look at this photo closely, you will see the left edge of my fabric goes beyond the 0 measurement on the cutting mat. The edge is a little "fuzzy" so I make my first cut then. . .

turn my fabric to align my new cut edge with the 0 mark. Then I can measure over at my cutting line and trim off the fuzzies.

This isn't a selvage edge.
 Selvages are almost sacred around here!!
 I love to cut with scraps in mind. 

I make a generous selvage cut - here it's 1.5 inches. Sometimes if the pattern is small enough I even cut a 2 inch selvage to use.

Once I cut 2 strips of fabric for the biggest blocks, I had to make a decision. I could have cut 2 strips of 3 3/8 inches, but then I wouldn't have had enough fabric left to make blocks in the smaller size. I'm using lots of different blacks in this project and want to have a mix of fabrics in each block area. I decided to make one strip of each required size, then make a 1 inch selvage {which is big enough when it's a no-word selvage} and that left me with a 2 inch strip. 

My 3 inch strips turned into bricks 3 inches by 5.5 inches. I found that leaving the strip folded over wasted fabric and actually gave me incorrect cuts {I was off by 1/8}. Unfolding my strip gave me 3 useable bricks and a little bit left to make a 3 inch square.

My timer went off as I made the last cut! 

Perfect timing.

I counted up the pieces I cut today, updated my notes and put everything away for next time.

The "best" part of this session? I found out I need to buy some more black fabric!!

Do you cut with scraps in mind? 


With Joy,
Sarah Vee

Read more...

Making a Mess!

>> Thursday, July 21, 2011


This is what my "making" area looks like in my sewing space today.
I had a plan for the next part after the stitchery - then changed my mind.


Part of my personal challenge for this project is to use colour combinations that I usually don't.
A quick look through my blog shows that I rarely use the three primary colours together.
When I went through my little embroidery floss stash from my husband's Granny, the red, blue and yellow jumped out at me.
One decision made:)

I also used a light blue solid for my stitching background. I decided to only use the embroidery floss from Granny as another little mini challenge within the project. The light beige for the girl's body and her brown hair were in the stash too.


I wanted to use a frame of quilt blocks around the stitchery - again something new to me, but easy. I decided on log cabin blocks with traditional red centres - to keep that primary theme going. {Can you believe in 14 years of quiltmaking, I've never made log cabin blocks?!}
I'm also trying to use up some little bits of fabric that are piled up in the basket you can see in the first photo. Surprisingly, I have enough small light scraps to make these blocks. They are going to be 4 1/2 inches unfinished.

This is where my plans changed!

Once I started building up the log cabin blocks, they didn't look like what I thought I wanted. I'm still going to make 12 of them though - maybe bring them up to 51/2 inches - and make them into their own little quilt.

The New Plan

The new plan is to keep the border simpler. I'm going to do half square triangles around the stitchery. The blue solid I used for the stitching came from a fat quarter. I should have enough to cut enough 4 7/8inch squares to make half square triangles all the way around. I will still add a skinny inch border before the blocks. I'm planning to use up red, blue and yellow scraps to make the other half of the half square triangles.

That's the plan today!

Some tips to give your plan some focus:

~Decide on a size before you start.
Or at least the end result. You can use the inspiration words ON something or use them as inspiration to make something.

Some other ideas I had include making:
a sampler quilt
apron
girl stuffie
tote bag
a donation quilt

~Keep it simple.
Don't try a whole bunch of new things. Pick a new colour to play with and a new technique. Or get out a quilt pattern that you love and have never made time to make.
This is supposed to be fun - don't set yourself up for failure:)


How is your making coming along?

Leave a comment here with a link to your blog so we can visit:)

You could also add photos to the Follow Your Bliss Makealong flickr pool.

Remember there is a blog roll in my sidebar of Follow Your Bliss Makers. Email or leave a comment if you would like me to add you to it.


Are you simply enjoying the making from the sidelines? If you decided to sit this one out, please let me know if you are enjoying what you see! I'd love to answer questions or find out what you are doing instead:)


With Joy,
Sarah Vee

Read more...

Happy Followers

About This Blog

This blog exists to share my quiltmaking and joy of colour to inspire others to find their joy.

  © Blogger template Simple n' Sweet by Ourblogtemplates.com 2009

Back to TOP