Showing posts with label colour. Show all posts

Colourful Links and Batiks

>> Saturday, July 12, 2014


My newest batik charm squares seduced me into cutting them - just a wee bit - to play with this
fun, quick way to make nine patch squares.


The block is only 3 inches square when finished!

Too cute, I couldn't resist:)

Link to Fun with Barb Nine Patch tutorial


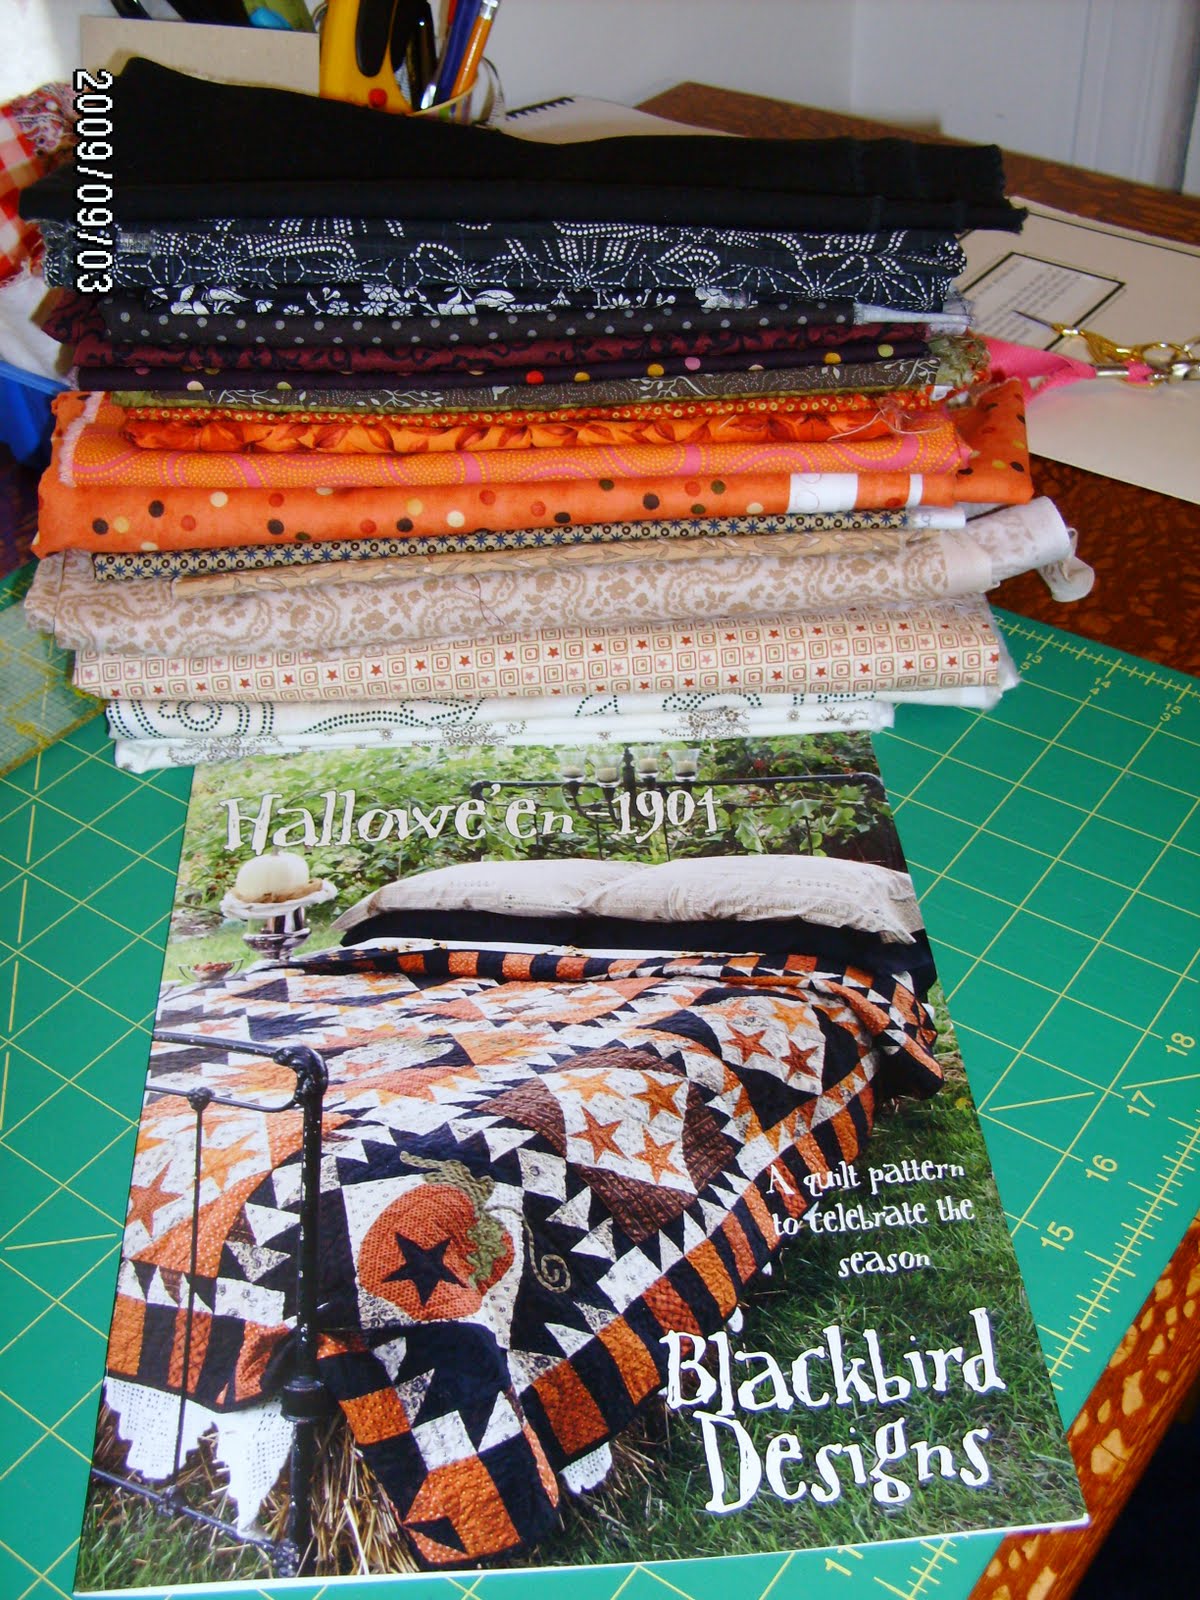
I did complete another Halloween 1904 block (my #5). I just need to add its border on (the rectangle bricks you can see on the right).


But the batiks are charming me!


So far I've cut three 4 1/2 inch strips off of this 2 yard piece of batik that I bought a few years ago now.


The batik has me mesmerized with what the colours do - how they fade, change, darken as you look around the one piece of fabric. Maybe that's the magic - that one piece of fabric can do what a whole quilt usually does - pull you in to savour every inch of it!


The tutorial results in making 2 nine patch blocks at the same time that are opposite each other. Again, look at how much there is to see in the fabric!

I've been thinking a lot about colour this week too.

I read this neat article by Maria Elkins (now I know who she is!) over at this site and learned about a new to me color theory - Munsell color theory. Have you heard of it?


{Of course I'm keeping the little 1/2 inch strips I'm trimming off the charms! I'm not sure yet what I'll do with them, but I know I can lay them between 2 pieces of Mistyfuse and just create something!}


There's also a new modern quilting technique book out. So far the blog 'press' about the book has focussed on the first chapter of the book, color.

Here's a good review article on the Sew, Mama Sew blog about the chapter and its take on color.
(really reminds me of what Maria Elkins was talking about!)


I've been really thinking lately about putting together a program or group of projects about how I play with colour. I'm thinking about a course to guide you to make "happy quilts". I wasn't going to focus so much on color theory - although knowing a bit of that will make you feel more confident in your choices and give your gut instincts a bit more direction:)

What do you think? Would you be interested in a course - or series of workshops - or? - from me about how to make happy quilts?

And by happy, I mean quilts that make YOU happy.

That's kind of the idea here - to combine theory and practice with fabric and play so you can build your confidence in choosing fabrics to make quilts that make YOU happy!
What else do you think you would need in a course about quilts and colour?
 I'd love to know!


Enjoy the weekend,


Sarah V


p.s. {I'm also itching to make a bag! and found this crossover bag by Bari J.}

Read more...

Making a Mess!

>> Thursday, July 21, 2011


This is what my "making" area looks like in my sewing space today.
I had a plan for the next part after the stitchery - then changed my mind.


Part of my personal challenge for this project is to use colour combinations that I usually don't.
A quick look through my blog shows that I rarely use the three primary colours together.
When I went through my little embroidery floss stash from my husband's Granny, the red, blue and yellow jumped out at me.
One decision made:)

I also used a light blue solid for my stitching background. I decided to only use the embroidery floss from Granny as another little mini challenge within the project. The light beige for the girl's body and her brown hair were in the stash too.


I wanted to use a frame of quilt blocks around the stitchery - again something new to me, but easy. I decided on log cabin blocks with traditional red centres - to keep that primary theme going. {Can you believe in 14 years of quiltmaking, I've never made log cabin blocks?!}
I'm also trying to use up some little bits of fabric that are piled up in the basket you can see in the first photo. Surprisingly, I have enough small light scraps to make these blocks. They are going to be 4 1/2 inches unfinished.

This is where my plans changed!

Once I started building up the log cabin blocks, they didn't look like what I thought I wanted. I'm still going to make 12 of them though - maybe bring them up to 51/2 inches - and make them into their own little quilt.

The New Plan

The new plan is to keep the border simpler. I'm going to do half square triangles around the stitchery. The blue solid I used for the stitching came from a fat quarter. I should have enough to cut enough 4 7/8inch squares to make half square triangles all the way around. I will still add a skinny inch border before the blocks. I'm planning to use up red, blue and yellow scraps to make the other half of the half square triangles.

That's the plan today!

Some tips to give your plan some focus:

~Decide on a size before you start.
Or at least the end result. You can use the inspiration words ON something or use them as inspiration to make something.

Some other ideas I had include making:
a sampler quilt
apron
girl stuffie
tote bag
a donation quilt

~Keep it simple.
Don't try a whole bunch of new things. Pick a new colour to play with and a new technique. Or get out a quilt pattern that you love and have never made time to make.
This is supposed to be fun - don't set yourself up for failure:)


How is your making coming along?

Leave a comment here with a link to your blog so we can visit:)

You could also add photos to the Follow Your Bliss Makealong flickr pool.

Remember there is a blog roll in my sidebar of Follow Your Bliss Makers. Email or leave a comment if you would like me to add you to it.


Are you simply enjoying the making from the sidelines? If you decided to sit this one out, please let me know if you are enjoying what you see! I'd love to answer questions or find out what you are doing instead:)


With Joy,
Sarah Vee

Read more...

Colour Play Exercise

>> Saturday, June 11, 2011


An inspiration print - an extra piece from cutting out backing panels for my Lady of the Lake.


I reached into my scrap bin that holds all of my recent off cuttings. It's pretty full right now.
I dug right down to the bottom and kept pulling out pieces that matched the colours in the print.
It was harder to match other prints, but surprising how many fabrics did go with it.


I was really surprised at how many greens I had. I always feel like I don't have enough greens. Obviously I'm wrong!

I left this up on my design wall for a couple days to enjoy looking at.

I finally convinced myself it didn't have to
BECOME anything.

The PLAY was the THING.


All the pieces are put away again. Waiting for another play date.

Have you PLAYED with your fabrics lately?


With Joy,
Sarah Vee

Read more...

Making from Scraps

>> Tuesday, June 15, 2010

There are lots of ideas being blogged lately about using up scraps.
Here are a few of my methods.


My string blocks are made each week from fabrics I've been using that week. When I started I had to reach into my strip bin to find enough. But it lives right under the cutting table,

So my strips and storage is always close. {The bin is divided with a piece of cardboard to keep foundation scraps on one side. And I will admit to another small bin of scraps beneath the strips that still need to be sorted} The fusible batting lives in there for now because I really want to try Gudrun's tree she did{called Sweet Trimmings} during LAST Fall's Cross Country Christmas blog hop! I finally found some fusible batting when I checked out a little gift store while we were shopping for a new car!


My liberated Churn Dash was made on the spur of the moment. It was easy because my scraps were already sorted by colour.

Some of my scraps end up in reused strawberry containers that I've cut the lids off of and put in the top drawer of my storage unit. I sort them by colour and it's a great place for me to find that one piece I need to add to applique. In this case, I enjoyed the challenge of using the scraps I already had sorted to make a bright, fun block.


June's Block Lotto blocks have given me the chance to use up some odd size scraps. These are ones that won't make 2 1/2 inch squares or larger pieces.


I store lots of my scraps in different reused strawberry containers. These ones have waste triangles, 3 inch strips and Christmas scraps separated from various projects. The middle bottom one is where I found my scraps for the baskets.

At one point I even went through and measured scraps to make more of Nanette's cottage houses. I noted the number of pieces and the size required on the sides of the bins. I do have some bigger pieces I should spend some time cutting for this project. I think some cottages and liberated baskets would be happy together in a quilt:)


I have a larger freezer baggie pinned above my cutting table. I put my selvages in it as I work. Once it's full and I"ve played with some, I dump them into this bin. It's getting full so I will have to do some more selvage projects again. I'm thinking of pulling out the Christmas ones to make a stocking.

Lots of scraps in lots of places. Even if you try just one, it will make play time that much easier.

This is my latest scrap cuttings. I am cutting 2 1/2 inch squares in the hopes of making a watercolour quilt someday. I have always liked them and felt I would have to start collecting a whole different type of fabrics to make one. Wanda suggested to just start cutting from what I have - and I'm happy to say I think I will be able to make my very own SEW JOY Watercolour quilt one day! I'm finishing up another quilt so I can start to keep these cut blocks sorted by colour on the tray I'm using. Maybe for my 40th birthday {wow! am I really going to have one of those} in a few years I'll have enough. It's either that or a 'real' applique quilt.

With Joy,
Sarah Vee

Read more...

Fun Quilting Projects

>> Saturday, June 12, 2010


First June string block. I need to finish last week's still.


The last Mystery Basket block. It's 18 1/2 inches square unfinished. I'm getting anxious to see the setting plan and how well my blocks fit together.


A fun experiment. I used a liberated method of drawing the churn dash with my rotary cutter. Then I used the background as foundation to string piece the shapes. I'm thinking about trying some more traditional blocks this way to make a liberated sampler quilt - using my fabric I won from Vicki as sashing.

Hope you're having fun with your quilting projects!

With Joy,
Sarah Vee

P.S. Congrats to CARMEL who won the selvages and coaster!

Read more...

Orange Ya Glad It's Sunday Night!

>> Sunday, April 11, 2010


This weekend has resulted in little bits of handsewing and lots of housework. The kids have been little grizzly bear cubs and I need some fabric relief! Oh yeah. I did that already!!


Added some more colours to my stash. I love the blue from Denyse Schmidt's Hope Valley on the right. The lime green is from Mezzanine by Patty Young. The guitar print from Michael Miller I couldn't resist either with my husband being a guitar player. I've started to buy a minimum of 1/2 yard pieces to fill in my stash. I do plan on buying some colour grouped fat quarter packs too - to add some variety.

I am working to rebuild the colour wheel in my stash as I depleted some colours last year.


Most of the orange I had went into my daughter's quilt. This quilt was made during Pat Sloan's Orange Pile challenge. It's tied and has no batting. She loves it!


My replacement oranges and all the black and tan fabrics I collected last year somehow combined perfectly for this Blackbird Designs quilt. I can't wait to get into this one! I started cutting pieces many months ago now and am just about ready to focus on it. I want it done for this Fall.

I'll show some more Orange fabric tomorrow! It's back in action on my Design Wall!!

With Joy,
Sarah Vee

Read more...

A Bag for My Mom

>> Saturday, March 13, 2010

This is the bag I made my mom for her birthday.


I would love to keep it, but I made it with these fabrics specifically for her because she recently became a Grandmother for Africa.


I used the big tote bag pattern from this magazine.
I did make a few changes, though.


I didn't use 2 1/2 inch strips to make the larger top and bottom pieces on the outer bag. Instead I used use large prints - the bottom print here I didn't even know I had enough of until I went shopping in my stash.


I used a heavyweight sew-in interfacing on the outer bag pieces - because I had some! Not a usual ingredient in my cupboard, but, I had bought some to make TIES with and well, that my never happen. So, I used some on the outside panels and tucked some inside the pockets. I would use it again as it does give the bag some body and not much bulk. I didn't use any interfacing on the lining and it is a bit 'droopy'. I think it makes it behave more like a purse than a bag. We'll see if my mom thinks that's a good thing!


I bought this panel awhile ago because I loved it. It's been sitting in a pile ever since. So I cut it up and gave it a useful life. I measured to make sure it would make all the pieces I wanted then I started to dissect it!


From this panel I retrieved:


*two strips for the binding across the top of the pockets ( a detail I really like!)


*the inner pockets - I cut the columns of people you can see on the panels in half, then sewed the halves together to get the length I needed for the inner pockets

*two lining panels AND *two strips for the handles


I added a recessed zipper to the bag - thanks to the guidance from this tutorial.
I really like this feature and will be adding it to more bags in the future.

*Everything for this bag was made from what I had on hand. From the magazine pattern, interfacing, fat quarters, the panel - even the zipper! I inherited it with my husband's granny's stash.*

I guess I do have a pretty good stash. Inspiring and useful.

With Joy,
Sarah Vee

Read more...

Friday Finish and A Pile of Olympic Fabric

>> Friday, February 26, 2010

My Valentine Runner is Quilted!

I made the runner last year. I know I used this big block pattern, which was in a Fon's and Porter Love of Quilting magazine (maybe even the Feb 2009 issue?) because it would give me large spaces to practice quilting.
A year later, here it is:)


I used a different colour thread on each of the three blocks. I really like the peach thread on the pink. In this photo you can see the circle of hearts in the middle of the block and some of the heart border.


I traced the paisleys from the fabric onto freezer paper and used that as a sewing guide in the two spaces between the blocks. Paisleys are an easier curve to sew than the hearts, but I like how the heart border turned out.


Here are my February strip blocks. Can you tell I was going for an Olympic theme with my last block? I may even stitch something in the white strips. Although then I may have to do it on each block.


Speaking of the Olympics. . .


Do you think I've been influenced by the Olympic colour scheme?


Maybe just a little?! I picked these fabrics up on sale while shopping for my giveaway. How does that saying go - one for you, two for me? or three!! Anyway, I was impressed that I bought tone on tone fabrics for myself. Usually I buy big prints. Right now I have quite a few big prints waiting for these kinds of fabrics so they can play nice together in a quilt.

I've also started to buy more of a fabric. I bought half a metre of the lighter green and a metre each of the beige and dark green. This way I can use them as a main fabric - I would use any of these as background fabrics - and not have to limit design decisions on how much of these colours I have on hand.

A few more things waiting to be finished this morning.
Then onto March's list of things to get done!
One pressing big project is waiting for me. Time to move it to the front of the sewing line.

~
With Joy,
Sarah Vee

Read more...

Progress and Procrastination - 3 Takes

>> Thursday, February 11, 2010

I got the borders on my Charming Tiles quilt top. I'm finding I need a bigger vertical space to take pictures of my quilts - my quilts are growing! This one measures 49 x 60 inches.


My newest library find. It is for painters, but she discusses at great length seeing colour as VALUE. This is a lesson I can translate to choosing fabrics for my quilts. The cool bookmark my daughter bought for me at her school book fair this week (after I oohed and awed over the one she bought for herself first:))


My Procrastination Photo of (last) year! I made this table runner for last Valentine's and STILL have to quilt it. I didn't even sew shut the little gap from turning it right side out. I am really working on getting over the final hurdle of quilting a top. It's something I've always slowed down at. I could count all the quilt tops looking at me to get DONE already - I think I have enough fingers to count them all!
This one I would love to finish for this year. For this weekend!!

Can I do it? Yes. Will I do it? We'll see.

Is there a step in the quilt MAKING process that slows you down?

~
With Joy,
Sarah Vee

Read more...

Getting a Handle on Monday

>> Monday, January 25, 2010


I've started to work on my first block for the Basket mystery quilt. I don't know what colour I want the handle to be. . . the orange is my preference.

This light blue colour is the one suggested to be used by the pattern picture - repeating the middle of the basket.

My husband likes the green - but I don't have any more of it:)


That leaves the dark blue as my last option.

I guess I could add something completely different!

What do you think? Which would you pick?

(I'm just glad I took a picture and noticed the one square going the wrong way BEFORE I sewed it!!)

Check out the designs everyone else has up through the links at Judy's blog.

This one will get pieced over the week. Plus, I'm working on my Season of Grace stockings. And putting TOGETHER my Birthday Baskets quilt panels. More pics later in the week.

With Joy,
Sarah Vee

Read more...

Happy Followers

About This Blog

This blog exists to share my quiltmaking and joy of colour to inspire others to find their joy.

  © Blogger template Simple n' Sweet by Ourblogtemplates.com 2009

Back to TOP