Showing posts with label applique. Show all posts

Happy Blocks - A and B

>> Sunday, August 11, 2013


These blocks make me smile!

An alphabet applique quilt that Deb is sharing on her blog - The Toothfairy Quilter
{my letters still need to be stitched - machine blanket stitching is done around shapes - new pics soon!}


These stars make me happy because they are from the second project I will finish from Quilt Sampler 1998!
{To see my first project from this issue click here}


Stars are in the quilt in top picture


The stars  work out to the same size as the letters {6 inches} so I decided to challenge myself to make them in fabric matching each letter. So far I'm making just from stash too:)


Another happy quilt just for me - and my FIRST alphabet quilt!

With Joy,
Sarah Vee

Read more...

Mug Rugs for Teachers

>> Monday, November 26, 2012

 Two quick, fun gifts made! Apple mug rugs for my son's two Senior Kindergarten teachers.


The apple applique motif is from Kay Mackenzie's book, Scrap-Applique Playground.
I even used her technique of using up stash bits to "make" the applique fabric. 
It's a great book! {tell Santa! wink wink!}


I used up leftover strips from the reversible bag I made as a Christmas gift. It's a large kids print and lots of the images get cut off - but that's okay. They 'echo' the sentiment of the apple and give it context {as opposed to maybe a red and white check fabric that might make a more folksy/kitchen statement}.

I also LOVE the blue leaves!

Two more gifts checked off. 
Back to it!
Enjoy making with your hands from your heart,

Sarah Vee

Read more...

Summertime Fusing Fun

>> Thursday, July 19, 2012


Are you ready for some fusing fun? 


My Inspiration

During the last month of school my son kept coming home with gardens he had drawn. This one is full of strawberries with a big blueberry in the middle! 

Does it look like a quilt to you?!?! 
It did to me!
Plus I liked how the strawberries just looked like triangles. Simple lines to create a sweet treat.


It got me thinking that fusing strips of fabric then just making diagonal cut lines could create a whole row of strawberries. Really quick and easy!
My favourite fusible for this technique would be Mistyfuse because there is no paper backing to worry about coming off before I'm ready to use the fabric. 
Plus, with making triangle shaped fruit, I don't really need templates!

You can use whatever fusible you have on hand. 
Whatever fabrics you have on hand!


I ended up creating a few different fruits and a carrot. Simple shapes to cut freehand.

Here's what I did:

1.Drew my idea on a piece of 8.5 x 11 inch paper. 

2.Made some fused fabric:
1 strip of orange
1 rectangle of pink {with bonus little print on it to look like seeds}
1 wide strip of bright green
1 thin strip of dark green {approx. 2.5 inches}
2 strips of red {probably close to 2.5 inches wide. I only used part of one for these strawberries}

3.Cut out my shapes from fused fabrics.
One cutting tip - I made the strawberry 'tops' by cutting freehand 'x's out of the fabric. 

4.Fused shapes on background. {Background fabric started out 12.5 x 15 inches}

5.Stitched around raw edges with different colour thread. Most I did blanket stitch by hand, but the carrot top I used my machine. I did stem stitch around the strawberries.


Then I made a placemat!

My son saw me making the fruit and immediately thought they were for him!
With his birthday coming next week, I put on my birthday gift thinking cap and made my appliqued piece into a placemat.

To make the placemat you need in addition to your appliqued piece

pocket panel 12.5 x 4.5 inches
pocket {I use the same fabric} 6 x 4.5 inches
backing fabric 13 x 20 inches
batting 13 x 20 inches
binding {I used bias binding tape from granny's stash}

1.Trim appliqued piece to 12 x 14.5 inches
2.On the top edge of pocket you will want a finished edge: simply fold under 1/4 inch seam, then fold under another 1/4 inch seam. Sew to create a hem.
3.Line up pocket with RIGHT SIDE UP on bottom half of pocket panel.
4.Put appliqued piece RIGHT SIDE DOWN on pocket panel, lining up the edges you are going to sew down. You *could* put your pocket on the other side of the appliqued piece.
5.Sew to join edge. Press seam open.
6.Create your placemat sandwich with backing fabric RIGHT SIDE DOWN
batting, then appliqued panel RIGHT SIDE UP.
7.Pin baste and quilt placemat remembering NOT to sew the pocket closed! I simply stitched in the ditch where the pocket panel and appliqued piece joined. Then around each of the fruits and veggies with blue thread to match the background.
8.Trim placemat to 12 x 18 inches.
9.Attach binding.
Enjoy!

Make one Just Like Mine!


Of course, I went one step further and made templates for you. 
Just in case you wanted your fruit to look like mine!
You can use any fusible product to copy the templates.
If you are using Mistyfuse, copy the templates onto one of your pieces of parchment paper. When you fuse, make sure the pencil side is touching the Mistyfuse.
You can leave the parchment paper on and cut out your shapes - or remove the paper from lighter fabrics and cut on the transferred pencil lines.


Long post! Hope you enjoy it!
Sarah Vee
                             

Subscribe to my newsletter to find out when more fun tutorials are posted - subscribe here              

Read more...

100 Blocks Guest Post - Kay Mackenzie

>> Friday, November 11, 2011


Greetings friends of Sarah Vee! I'm Kay Mackenzie, a quilter and designer in Santa Cruz, California. Sarah and I both have blocks in Volume 4 of Quiltmaker's 100 Blocks. Not only that, we've discovered that they're right next to each other on the cover! How fun is that?

Sarah told me that she's doing a series on sashing options for joining blocks together, and asked me if I would like to do one on appliqué blocks. I thought I would show two simple ideas that lend a little bit more interest than just setting blocks together plain.

Lots of classic appliqué quilts have no sashing and are simply stunning. If you'd like to add just a little touch to the setting, here are a couple of things I've done.

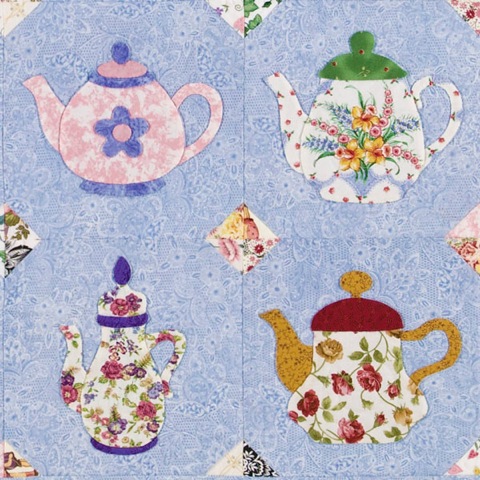
In the sampler quilt "Shall I Pour?" from my book, Teapots to Appliqué, I used floating squares.


The sashing strips are the same fabric as the background squares, and the cornerstones are squares of the print fabrics used for the teapots. This design puts little touches of harmonious color in and amongst the blocks without overwhelming them.


In "A Little More Tea" from Teapots 2 to Appliqué, I used the "sew and flip" method, also called "snowball corners," to add scrappy triangles to the corners of each block.


When the blocks are sewn together, the triangles form quarter-square diamonds of unmatched prints, creating a mosaic or picassiette effect. Again, a way to add interest without taking away from the appliqué in the blocks themselves.


I hope these simple ideas help spark your thoughts about settings!

Cheers,
Kay

By Kay Mackenzie
http://www.kaymackenzie.com  Books, patterns, & etc. for the quilter
http://www.allaboutapplique.net  Appliqué blog
Author • Inspired by Tradition: 50 Appliqué Blocks in 5 Sizes • That Patchwork Place
Author • Scrap-Appliqué Playground • coming April 2012 from That Patchwork Place


Sarah here - Thanks so much, Kay, for your great applique setting ideas. Make sure you check out Kay's blog today as she is featuring her 100 Quiltmaker block today - which means another chance to win a copy of the magazine!


This is the last day of the tour so you might also want to check the Quilty Pleasures blog to make sure you hit all the designers' blogs before the end of the giveaways.

And you still have time for my 100 Block giveaway if you leave a comment here before midnight tonight.


With Joy,
Sarah Vee

Read more...

Two Cake Blocks

>> Thursday, March 31, 2011


I fell behind a week in my Layer Cake posting.
Here is Block 10 done in Prayer Flag by April Cornell.


Here is Block 10 done in Bejeweled by Susie Robins.
I think this block would look really good with 4 set together with the leaves joined in the centre. You could make a nice Christmas cactus table topper.


I had enough days off this past week to get one Block 11 done!
It`s a bit tricky to get the different sections to fit. Some seams need to be pressed open - others need to be pressed together.
I also used one whole blue layer cake square and some extra because I fussy cut to keep the motif going in the same direction. The pieces can be cut from one square if directionality is not an issue.


These are all the layer cake squares and scraps that I have left. I intentionally used some scraps for one of the colours in Block 11 to keep 4 whole layer cake squares for the last block.


I had lots of fun making this pillow cover with some of my layer cake scraps! I made this coordinating pillow cover as part of the Book-a-Round I participated in for Kay Mackenzie`s new applique book.


Today is the last day of the tour. Visit Kay`s blog for more info.

Maybe I will make an applique sampler quilt someday soon.


With Joy,
Sarah Vee

Read more...

Applique with Kay: Book-A-Round Day

>> Tuesday, March 29, 2011


Today is my turn on Kay Mackenzie's Book-A-Round.
I am thrilled to be able to share Kay's new book with you.
MY GIVEAWAY IS CLOSED, BUT PLEASE STILL ENJOY MY POST!


This is Kay's second book {and second book-a-round!} I found Kay in blog land shortly before her first book was released. Actually, I think it was her posts about the process of getting her first book published that drew me into her blog.

I have been quilting since 1997 and have always admired applique. But I always wanted a quick finish and avoided the "A" word for many years - thinking it was too time consuming and precise for me. I love using bright colours and mixing contemporary fabrics with traditional block patterns. When I found Kay's first book I was finally ready to explore applique my way - with lots of colour!

The flowers in my banner this month are from Kay's first book.


I used them in this quilt that I made for one of my nieces. You can read about this quilt here.
I hope you'll take some time and explore my blog a bit. You can check out my tutorials here.


I asked Kay a couple of questions about colourful fabrics and applique. I also made a project with one of the blocks in the book. I hope you enjoy both!


How would you advise someone to shop for appliqué background fabrics if they've never done appliqué before? Is there a foolproof fabric?

KAY:
It actually all depends on the look you want for your project. I guess white or cream is pretty foolproof, especially for the old-timey blocks in this book. I use them a lot, especially cream. I enjoy subtle tone-on-tone prints but there's nothing wrong with solids. Toiles can work beautifully as backgrounds too. A black background is striking and dramatic. What you want in the end is contrast between your background and your appliqué motifs. That will set off your appliqué the most effectively.


{I picked my background fabric from this collection of fabrics}


I was wondering how you go about deciding on background fabrics. Do you find the background to match your appliqué shape colours or do you match your appliqué to the background?


It can work either way for me.
It just depends on what I've got in my stash,
the project, and the final look that I have for it in my mind's eye.

This is one of the sample projects in the book that caught MY eye!


Do you have any tips for scale of prints on fabrics for appliqué - specifically I guess for the Baltimore album 'look'? Is there a size you would recommend - or one that doesn't 'work' as well.


I don't think there's any right or wrong for that. You can't even tell a large-scale print is large-scale when you cut it into smaller pieces. Just go for what looks good to you. Tone prints work great, and you can work in plaids, stripes, polka dots, prints, whatever! A surprise when you look close is fun and can add a spark.


Here is my project: a distelfink pillow cover


Made with fabric scraps leftover from my Layer Cake of Prayer Flag by April Cornell
and a fat quarter of kona solid to go with my Layer Cake Quilt Along Quilt!

Kay's applique blocks are very simple and versatile.
Plus, she gives great advice and tips without making me feel like
I should know it all already!

She explains several different methods of applique and makes it,
well, hard to resist!


Plus, the CD makes it easy to print out accurate
{with NO enlarging required!}
block templates
for whatever method of applique you choose - in 5 different block sizes!


Here are my applique fabrics spread out on top of the template.
I even made notes around the edges of the template as I went.


LEAVE A COMMENT ON THIS POST TO WIN A SIGNED COPY OF
INSPIRED BY TRADITION
BY KAY MACKENZIE
{donated by her publisher, That Patchwork Place}


OPEN TO U.S. AND CANADA RESIDENTS ONLY DUE TO SHIPPING COSTS

LEAVE A COMMENT BY 9 P.M. EST WEDNESDAY TO BE IN THE RANDOM DRAW
MY GIVEAWAY IS NOW CLOSED!
I WILL CONTACT THE WINNER AND ANNOUNCE ON MY BLOG SOON.
THANKS FOR COMMENTING:)
COME BACK TOMORROW FOR ONE MORE GIVEAWAY OPEN TO EVERYONE


A NEEDLEKEEPER MADE BY ME WITH ONE OF KAY'S BLOCKS ON THE FRONT


Thanks for visiting today! Remember there are more stops on the Book-a- Round. You can still go to Kay's blog for a guided tour.


With Joy,
Sarah Vee

p.s. Thank you for all of your kind comments! I am reading them all, but using my husband's work computer so I'm unable to take the time to reply to you. Normally, I do! And for sure, you will be receiving an email from me if you are the winner!!


Read more...

Save the Dates!

>> Monday, March 14, 2011


Good Monday Morning, everyone!

This is just a quick little post to let you know that I will be one of the stops on a blog tour for Kay Mackenzie's newest book!


I can't wait to share my project with you!

The Book-A-Round begins on March 22 and goes to March 31.
You can go to Kay's blog right now and bookmark it or follow so you don't miss anything.
A book will be given away at each stop. I'm planning an extra little giveaway too:)

If you can't wait;) Kay's book is available at quilt shops, Martingale and signed copies are available from Kay at http://www.kaymackenzie.com

To get yourself 'in the mood' for some applique, you can check out the posts I did when I discovered Kay's first book here and here

My desktop computer crashed this weekend, so I am hoping to be back to 'normal' around here soon!


With Joy,
Sarah Vee

Read more...

Monday Morning Design Wall

>> Monday, September 13, 2010


My design wall this morning is covered with the building blocks for Pat Sloan's Lucky Charms sew a long. You can see how other people are progressing at the Old Red Barn flickr group. I'm trying to decide if I want to use the pink floral as my 1 inch inner border. That might get decided once I do the applique for the centre.


If you click to make this picture larger you can see the applique layout. I'm almost done tracing all the shapes onto fusible web. This will be something I tackle when my son's asleep and I don't have to worry about him being around the hot iron.


Of course there are some bright colours on my wall, too! The top blue and green are for my large churn dash block that I really should have done. This is for the quilt I'm making for my husband and will include blocks made during November, my month of the Sew Modern Bee.

Below that I started playing with some of my scraps and decided I might make some freeform log cabin looking blocks. For fun. When I finish quilting another project on my list.

The coloured strips are just leftovers I put up to look at. Not sure they will be anything but eye candy. Perhaps strips in a doll quilt?

Now that football season's here I do more hand sewing on Sundays. Blanket stitching on blocks or sewing down bindings. Hopefully by next Sunday I will have a lot more projects waiting for binding. Then I can get back to some piecing.

Enjoy some more design walls through Judy's links at Patchwork Times.

Sarah Vee

Read more...

Three Finishes Friday

>> Friday, July 30, 2010


My first finish isn't a QUILT finish . . . but it is related to quilting. I read the Emilie Richards' book that I won called, Sister's Choice. I took it with me camping and visiting and enjoyed reading it on the beaches! I won it as part of Pat Sloan's and Emilie's BOM prize for finishing all of my advent stockings.


This finish inspired the 2nd finish when I got home from holidays:

I put together the top for the Season of Grace BOM. I need to quilt it then attach buttons for all of the stockings to hang from.


My 3rd finish is a joint finish with my sister:

We made Bonnie Hunter's Double Delight quilt for our parents to celebrate their 40th wedding anniversary. We named ours, Ruby Delight. It's been one of the secret projects I've worked on over the last year.


I made the star blocks.


And designed and made the borders. And the binding - then I mailed it to my sister. You can see how well it all went together at my sister's blog. She was in charge of quilting it!

Here's a photo of the label {not sure you can read it even if you enlarge it} It was my first attempt at applique from many years ago. I kept it around and thought it would make a good label. Another use for those orphan blocks!

There, I did it! Some quilting this summer after all.

With Joy,
Sarah Vee

Read more...

Friday Fun & My First Guest Post

>> Friday, June 11, 2010


Happy Birthday to my niece!

This is the placemat I made for her, using my pattern and selvages.


I'm thrilled to direct you over to Kay Mackenzie's blog, All About Applique, where I am a guest blogger today. You can read more about how I 'do' applique with the blanket stitch.


You're Invited!


Lots of fun things happening here! Thanks for joining me:)

With Joy,
Sarah Vee

Read more...

Designing on the Wall

>> Monday, June 7, 2010


This was my design wall Friday night. My husband had plans to be away overnight so I started on some projects. I didn't get much done Friday night, but the rest of the weekend things progressed. The basket blocks at the top are for June's Block Lotto.

I finished my 2nd last block for the Basket Mystery quilt. Instructions for piecing the top should come out later this month.

This is my last block for the project. Printing out the design in black and white lets me see the designer's value placement. This helps me choose my colours as I usually don't use the same type of fabrics as the example. {I did originally have the blue and green centers reversed to match the example - but I like it better this way.}


Then I put my choices up on the design wall and walk away for awhile. Walking in and out of the room throughout the day I can see how I respond to the colours. In this case, I liked it, but something wasn't quite right.

Better. I had repeated the yellow in 2 flowers, but not the third. Now that I added it in I feel like the flowers go together better. This is just about all of the original yellow background fabric I have left!

Here's hoping the design wall helps me put the blocks together into a cohesive quilt top!

Check out some more design walls at Judy's blog.

With Joy,
Sarah Vee

Read more...

Happy Followers

About This Blog

This blog exists to share my quiltmaking and joy of colour to inspire others to find their joy.

  © Blogger template Simple n' Sweet by Ourblogtemplates.com 2009

Back to TOP