What is modern quilting?

I started to get stuck on this question once I pinned my set of liberated churn dashes. They were ready and waiting for some *modern* quilting!
I started with my go-to standard and quilted in the ditch around each churn dash. Then I quilted 1/4 inch away from the seam all the way around each one. I also quilted 1/2 inch away from the outside edge of this set as I'm using the "quilt as you go" method and will be joining it to the other large blocks.

Then I quilted a shoo fly in the centre of each churn dash. It's a another traditional block very similar except it doesn't have divisions in the middle squares. I did them on angles that somewhat followed where the fabrics in the churn dashes joined each other. Definitely liberated shoo flies!
Then I was stuck again. I hadn't thought about the uneven joining of the sides of the blocks when they were put together. I tried to maintain the appearance of the blocks joining at the centre, but didn't know how to make all of the white spaces look cohesive.
So I started thinking about traditional quilting.

I have a poster of this quilt. It was co-ordinated by Renske Helmuth and was sold at the New Hamburg Mennonite Relief Sale. Here is
the link to read more about it. You can read about Renske more on
her blog.{I've written about
the sale before. Click on the link for an inspiring show}
This is what I think of when I think of traditional quilting - on an applique quilt.
Curved quilting pieces = straight quilting lines.

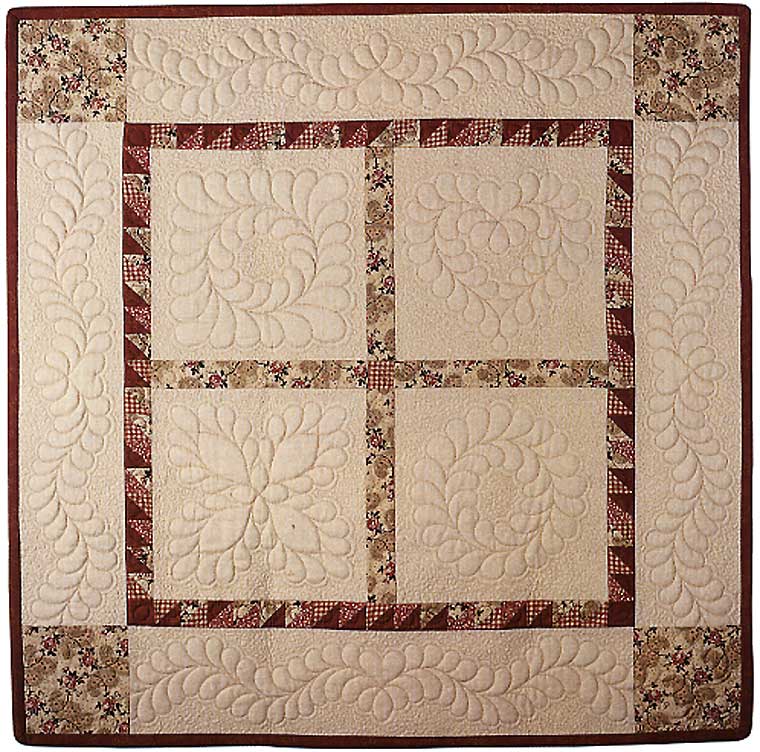
THIS is what I think of when I think of traditional quilting for square piecing and/or blank spaces. This quilt is the photo example for a
workshop with Sue Nickels. I have Sue's machine quilting book and should really spend more time with it:) Check out
Sue's website here.
square pieces/blank squares = curvy quilting lines
Surely there are MORE options! I love these traditions and wish I was better at implementing them in my quilts.
I did some more thinking about quilting designs that I have seen and liked over the years.
I remembered some neat, Hawaiian motif pillows that I saw at a friend's house once. {There's a few more techniques I still want to try!} But what did the quilting lines do?
Highlight the design of the quilt by echoing it!

Pretty simple to do and look modern doing it:)
I used the edge of my walking foot as a guideline to keep the spaces between the lines even. I decided to close in the design by having the last part of it sew right up to the line before it so I wouldn't have a 'dead end' of quilt thread to deal with. If you click on photo above you might be able to see what I mean. I also took artistic liberty in deciding where to make the connecting shapes start and stop. Where some edge triangles and squares meet I decided where to make them end.

What do you think? Did I * find* modern quilting - or at least an approximate one for my quilt?
Do you agree with my definitions of quilting - or do you have something to add? Please do!
How do you quilt your quilts?
I'd love it if you linked up in the comments to a recent quilt you've finished - and tell me what kind of quilting you did:)
With Joy,
Sarah Vee
Read more...

 Fabrics for Michelle's Sew Modern Bee month.
 Blocks for my Lady of the Lake quilt! I sent out an SOS through Pat Sloan's Quilt Mashup Forum when I discovered I was going to be short several blocks in this quilt.
 So far I've been sent blocks and block components so I can mix and match.
 Wonderful blues!!
 My fabric matching helper:)
 Hopefully 4 yards is going to be enough to finish.
 Here is one-third of the quilt laid out on my bed. With the feline inspector!